It’s a fact that no network-connected system can provide you with guaranteed protection against data loss. Software, OS and hardware vulnerabilities will never stop being found. Measures can be put into place to reduce the risk and you can follow the security best-practice handbook to the letter, but it will still be impossible to predict and protect against all attack surfaces.
Security experts Qualys released a post only last week about a ‘new’ local privilege escalation vulnerability on Linux systems (CVE-2021-4034). The exploit allows an attacker to gain full root privileges on a vulnerable host, and essentially means the sudoers file has been optional on almost all Linux installs since 2009!
Without hiring a team of security experts to patch, scan and monitor your network at considerable cost, how can you secure customer data and guarantee it is protected, even if the root account is compromised? Veeam have a solution to this problem with their local immutable storage, the Hardened Repository.
What is a Hardened Repository?
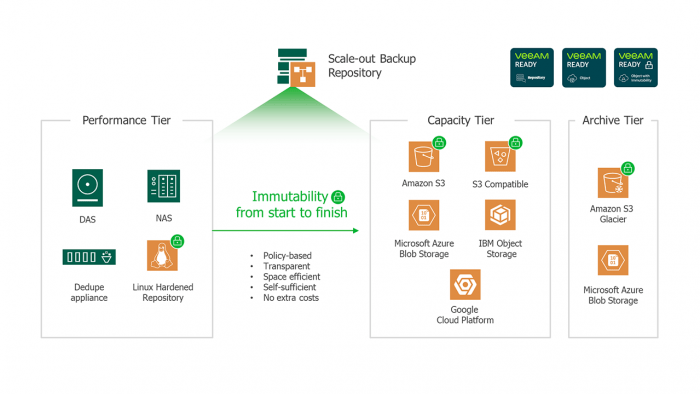
From v11, Veeam provides the capability to have immutable backups locally with its new Hardened Repository. This builds on the existing feature that allows you to store your Veeam backups in our S3 Compatible Object storage using the Object Lock API.
The hardened repository is connected directly to the Veeam server without any network or external access. SSH is disabled and Veeam components can only communicate using non-root credentials on limited TCP ports. The only way to access or manage the server is through the servers integrated management (such as ILO, or iDRAC – if enabled) or by physically accessing the machine. The repository essentially becomes an impenetrable black box.
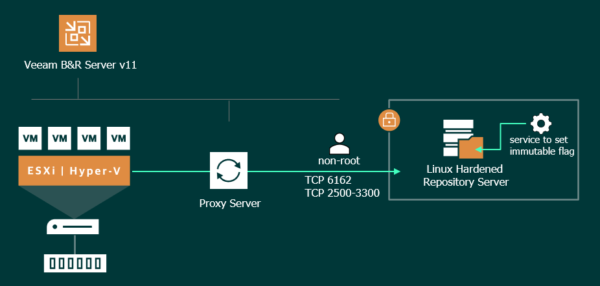
The Immutability feature protects backups against overwriting, accidental deletion, ransomware attacks and internal intruders, whilst the single-use credentials ensure backup files will be safe, even if the Veeam Backup & Replication server is compromised.
Setup Guide
Requirements
• Veeam Backup & Replication v11.
• Although the solution can run as virtual machine, a physical machine is strongly recommended for security concerns.
• A 64 bit Linux distribution: Ubuntu 20.04 LTS is recommended by Veeam.
• The Linux Server should support XFS (enable the use of the Veeam fast cloning technology) and it is the recommended file system to use.
• Since backups cannot be modified due to Immutability, only forward incremental with periodic synthetic or active full backups are supported.
• Unlike backup jobs, backup copy jobs require a GFS retention policy to be able to utilise the Immutability feature.
Configure the Repository
For this procedure the Ubuntu Linux distribution is used to implement the Hardened Repository. Download the .ISO file for Ubuntu Server 20.04 LTS then boot your machine to run the installation wizard.
• Install the OS following the wizard steps. Once complete, install the latest updates.
• Check the file system in use for the partition that will be used by Veeam to store the backups. In our scenario using LVM, we will create a new logical volume in the existing volume group creating during install, and assign it 8TB of space:
lvcreate -L 8T -n veeamrepo ubuntu-vgCreate a Local Account
You need to create a dedicated local user with the correct permissions so that the Veeam Transport Service has the correct rights to the Veeam mount. Create a new account dedicated to Veeam, and temporarily add it to the sudo group.
sudo useradd locveeam --create-home -s /bin/bashsudo passwd locveeamsudo usermod -a -G sudo locveeamConfigure the Mount Point
If you want to take benefit of Fast-Clone technology (Fast Clone is based on Reflink) to optimise space and performance during Synthetic Full operations, Veeam requires the file system to be formatted as XFS with Reflink enabled to leverage Fast Clone capability.
Access your hardened repository and retrieve the full path of the volume/disk to be used as the repository.
sudo fdisk -lThis will show the full path of our logical volume, for example: /dev/mapper/ubuntu–vg-veeamrepo
We need to format the partition with the parameters required by Veeam to leverage Fast-Clone technology: reflink and enable CRC.
sudo mkfs.xfs -b size=4096 -m reflink=1,crc=1 /dev/mapper/ubuntu--vg-veeamrepo -fCreate a mount point for the new volume (we created /mnt/veeamrepo) and then amend /etc/fstab to ensure the partition will mount automatically at boot. Once fstab is updated, mount the volume by running the command:
sudo mount -aAssign Permissions to the Mount Point
Assign permissions to access the /mnt/veeamrepo folder to the locveeam account using the following commands:
sudo chown -R locveeam:locveeam /mnt/veeamrepo/sudo chmod 700 /mnt/veeamrepoThe configuration of the Hardened Repository is now completed.
Adding the Server to Veeam
Add the new Linux Server to the Veeam infrastructure:
• Go to Backup Infrastructure area and right click Managed Server. Select Add server.
• Select Linux as server type.
• Enter the DNS name or IP address then click Next.
• Click Add and select Single-use credentials for hardened repository option to avoid storing the credentials.
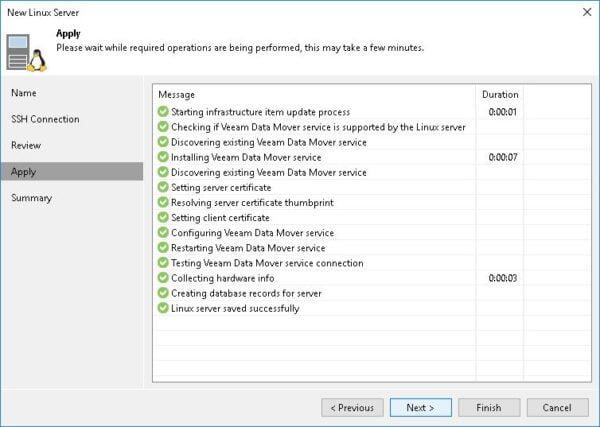
• Enter the credentials to connect the Linux Repository then click OK. Then click Next.
• Enter the credentials to connect the Linux Repository then click OK. Then click Next.Click Apply and when the component has been installed, click Next.
• Enter the credentials to connect the Linux Repository then click OK. Then click Next. The new Managed Server has been added successfully. Click Finish to exit the wizard.
Since the Veeam services have been installed, the user locveeam created in the Hardened Repository must be taken away from sudo group. These credentials are not stored in Veeam Backup & Replication Server. Also, since SSH is only needed when the Managed Server is created in Veeam, the SSH service can be safely disabled on the Hardened Repository to enforce security.
Creating the New Repository
We will now add the new server as a backup repository in Veeam.
• Access the Backup Repositories section and click on Add Repository button.
• Select Direct attached storage.
• Select Linux as operating system.
• Enter a Name for the new Backup Repository then click Next.
• Select the Repository server configured and click Populate. From the listed paths, select the partition configured in the Hardened Repository to store the backups. Click Next.
• Double check if the Path to folder is correct and click Populate to show Capacity and Free space. Enable the following options:
- Use fast cloning on XFS volumes (to take benefit of Fast Cloning technology)
- Make recent backups immutable for “xx” days specifying the retention requested
• Click Next.
• Specify the Mount server to use then click Next. Click Apply to continue.
• When the repository has been created, click Next. Click Finish to complete the procedure.
Create a Backup Job
Now the repository is added, we can configure backup jobs and backup copy jobs to utilise the immutable storage.
• From Home area, right click Backup and select Backup > Virtual machine > VMware vSphere or Microsoft Hyper-V.
• Enter the Backup Job Name and click Next.
• Click Add and select the VMs to backup then click Add. Click Next.
• Select the Hardened Repository as Backup repository and specify the Retention Policy. Keep in mind the retention specified in the Backup Job should be higher than the Immutability retention. Click Next.
You may receive this error.
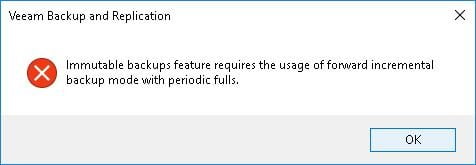
Click Advanced and check if Create synthetic full backups periodically option is enabled.
• Click Enable application-aware processing if VMs need VSS processing. Click Next.
• Configure the desired Schedule then click Apply.
• Select Run the job when I click Finish option and click Finish to save the Backup Job configuration.
Test Immutability
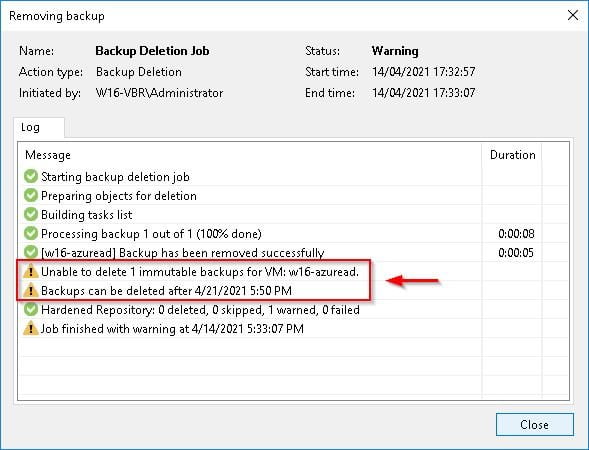
To test the Immutability, you can attempt to delete the backup.
• From Backups > Disk, expand the created Backup Job and right click the backed up VM. Select Delete from disk option.
• Click Yes to proceed.
• As expected, the VM cannot be deleted due to the Immutability feature enabled for the specific job.
To have a look at how Veeam works with Immutability, login to the Linux Repository and navigate to the folder of the Backup Job.
Run the following command to see the “i” attribute set to the backup files. This is the flag that makes the file immutable. (For a human friendly output run the same command with -l option at the end):
lsattrAll backup files are set as Immutable. Only the .VBM file doesn’t have this attribute since it needs to be updated by Veeam during the backup sessions.
If the XFS file system has been formatted enabling the Reflink option, during the Synthetic Full operation Veeam will leverage the Fast-Clone technology optimising space and performance.
Securing the Repository
Once the configuration and backup tests have been completed, the Hardened Repository must be secured to avoid unauthorised accesses:
- Make sure locveeam user is not member of the sudo group
- Unplug the Remote Server Management system (iDRAC, iLO, etc.) from the network
- Disable SSH access to the repository
- Configure the firewall to allow access with your Veeam Components and deny/block everything else.
To disable the SSH service in Ubuntu, from the console run the following commands:
sudo systemctl disable ssh.servicesudo systemctl stop ssh.serviceFinal Thoughts
At Vitanium, we suggest implementing this feature alongside your existing local repository to ensure truly air-gapped backups. Utilising this with our cloud connect repository, with additional immutable S3 archives will provide the greatest level of data protection for any business.
Expert support, should you need it
Of course, even the most straightforward technical tools require support, and our customers benefit from an exemplary service in this respect – our friendly team is always on hand to help you with any aspect of setting up and maintaining your backup and recovery system.
If you’d like to find out more about ensuring certainty when it comes to securing your data, contact us today, and we’ll be happy to discuss the finer details with you.